I think there is a lot of confusion out there on just what a properly secured SharePoint farm is supposed to look like. Having seen lots of farms, hearing all the security concerns and building a bunch myself I've seen all levels of secure farms. Microsoft has taken great measures to document the steps for securing a SharePoint farm. The documentation has many, many pages and many, many links so I won't recreate all that work here. Just remember, SharePoint touches and is touched by a lot of the company infrastructure. Properly securing a farm is important and shouldn't be ignored. This is the best place to start your security adventure. https://technet.microsoft.com/en-us/library/hh377941.aspx I'm going to cover what permissions to give what groups of users in order to complete their daily jobs.
I can build my farm with one account but should I?
A respected member of the SharePoint users group here in Atlanta says it best "Microsoft has made their products too easy to install" It's very easy for me to stick a SharePoint CD in the drive and click next a bunch of times and in a few minutes I have a farm set up and running. I understand that in learning the product you have to start somewhere and a single account farm for development isn't such a bad thing. What I tend to see is a development farm gets used by a department somewhere to test something. Next thing you know, this farm is promoted to a production farm. Someone then builds a company intranet on your single account SharePoint farm. Then someone hires a consultant. The consultant comes in and you give him or her the password to your single account SharePoint farm (probably via email). When the consultant leaves you are too afraid to change the password of the single account SharePoint farm because you have no idea what may break. Remember, this is now a production farm.
Wow, that sounds like my situation, what do I do next?
If you have the resources, I suggest doing what you initially intended. Convert the farm you have back into a development farm and build a new production farm. Get all new service accounts. Create a new OU in active directory and call it something meaningful like "SharePoint accounts". I like to keep my SharePoint accounts grouped together. That way new admins and such know what they are. The table below is what I consider the minimum number of accounts needed. It actually corresponds with the accounts that the Autospinstaller project group uses for their installation scripts. Autospinstaller and Autospinstallergui are amazing projects and you should check them out. When filling out the xml file or web form, you will be interviewed and you provide the information needed.
| Name | Description | Local Rights | Domain Rights | Notes | |||
| SP_Install | The server install account is used to perform the following tasks:
|
Local Administrator on all the SharePoint Servers. SecurityAdmin and DB_Creator rights on the SQL Instance | Domain User | This account is the account you log into the machine with to start the installation. This account will provision the farm account. | |||
| SP_Farm | The server farm account is used to perform the following tasks:
|
SecurityAdmin and DB_Creator rights on the SQL Instance | Domain User | This account will be the farm account. this account by default should not have access to the hardware except to provision the UPS. | |||
| SP_Portal | The SP_Portal account is used to run the Web Application Pools. | None | Domain USer | This is for the web application that is added by default. You can use it for more than one web app or create more for each web app. Do not add too many or the server could bog down. | |||
| SP_MySite | The SP_MySite account is used to run the MySite application Pool | None | Domain User | Mysite app pool. | |||
| SP_Services | The Services Account is used to run the Service Application Pool | None | Domain User | ||||
| SP_Crawl | The Default Content Access Account for the Search Service Application | None | Domain User | ||||
| SP_Search | Service Account to run the SharePoint Search “Windows Service” | None | Domain User | ||||
| SP_UserProfiles | The User Profile Synchronization Account | None | Replicate Directory Changes permission on the domain. http://technet.microsoft.com/en-us/library/hh296982.aspx | ||||
| SP_CacheAdmin | Web application Policy Full Control. So items can be cached by ASP.Net to improve the performance | None | Domain User | ||||
| SP_CacheReader | Web application Policy Read Control. So items can be cached by ASP.Net to improve the performance | None | Domain User |
My farm is now secured, how do I keep it that way?
*All of the screen shots are for 2010 but the process is exactly the same in 2013 and 2016.
Good question! you might say "I still have to give the installation or farm password to my consultant to get something done."
The methods I'm going to demonstrate are pretty easy to implement. The first thing to do is create a group in active directory where you will house your consultants.
I called mine SharePoint_Consultants and I will add James Cragle to the group.
 Next I have to decide what level of access the consultant needs. Do they need access to a site, site collection, web application, farm admin or PowerShell (Shell access)?
Web application: This access is an easy way to give access to all content. Log into central admin and add the group to User Policy for the web application.
- Log into central admin
- Select Manage web applications
- Highlight the web app you want to give access to
- Click the User Policy icon
- Click Add users
- Choose a zone (I usually leave it at all zones)
- Add the group and decide what level of permissions to give.
- The group now has permissions


 This gives access to every element under that web application so make sure it's what you want.
This access includes all site collections, sites, lists, workflows and documents.
This gives access to every element under that web application so make sure it's what you want.
This access includes all site collections, sites, lists, workflows and documents.
Central Admin Access: You may want to assign a particular group of people to manage components of SharePoint, for example the User Profile Service. If you want to give your consultant group access to central admin, you add them to the farm admins group. Remember, this gives the group access just to central admin, not to content in web applications.
- Click on Security
- Choose Manage the farm administrators group
- Click New then Add Users
- Enter the group name and select OK


Shell Access: This is a little more involved. This requires the highly privileged SharePoint Install account to log into a SharePoint server and run a PowerShell command. Those of you familiar with scripting tools like JAMS can script these changes and push them so you don't need to log in. Shell access is given to individuals, not groups. You might be able to hack it to accept a group but is it worth the maintenance risk? The script is a few simple lines.
- Log into SharePoint as the Install account
- Open SharePoint management shell
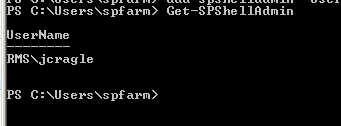
- To review a list of shell admins, type get-spshelladmin
- There might be users, there might not be.
- type in add-spshelladmin -UserName username

- User is now listed with shell access
- To remove shell access, type Remove-SPShellAdmin -UserName username
In conclusion, you can manage your farm a lot easier with AD groups. When it comes to security, we should all be diligent and understand what impact our changes have on the systems we maintain.


