Something that is missing in PowerApps as of the writing of this post is the ability to apply formatting to all data cards and their elements at once. I've seen a few people say you can select all and make changes but I have never had any luck with that. Until Microsoft updates this ability, here is a workaround that takes a bit of work up front, but pays off in the end.
Set up your fake CSS
Every data card has a lot of elements in it. You can use the code below as a starting point. This code has the most common items inside a data card that I typically apply changes to.
//the data below is set in 4 places, make sure any changes are copied there.
//Click ... next to App and choose "run onStart" to view changes
//the 4 locations are: App "OnStart", Sharepoint integration "Edit, View, New"
//datacardkey
Set(varDKBorColor, RGBA(0, 0, 0,0 ));
Set(varDKBorStyle, BorderStyle.Solid);
Set(varDKBorThick, 1);
Set(varDKColor, Color.Black);
Set(varDKFill, RGBA(255,255,255,1));

//datacardvalue
Set(varDVBorStyle, BorderStyle.Solid);
Set(varDVBorThick, 1);
Set(varDVColor, Color.Black);
Set(varDVFill, RGBA(255,255,255,1));

//datacard
Set(varDCleftCol, 0.2); //this one and one below must equal 1
Set(varDCrightCol, 0.8);
Set(varDCBorColor, RGBA(166, 166,166,166));
Set(varDCBorThick, 1);
Set(varDCBorStyle, BorderStyle.Solid);
Set(varDCFill, RGBA(255,255,255,1));
Set(varDCFont, Font.Arial);
Set(varDCFontW, FontWeight.Normal);
Set(varDCFontS, 9);
Set(isVisible, false);
What I have done is set a bunch of variables that I am going to reference in each card. I have each section separated out as an easy way to remember what element they belong to. You can organize them any way you see fit. I also try to name the variables by their location. In the very first item, varDKBorColor, I would apply that to the Border Color of the Data Key element in the datacard.
Where to apply this code
I'm going to just go start with PowerApps in horizontal mode which is the most difficult to work with.
This is a simple form with a few fields and a button that saves the item back to a list.
The first thing to remember is that on a SharePoint form, the SharePointIntegration overrides the default App commands. So, if you are editing your form in the editor, changes made in the editor here will not be applied to the New, View and Edit forms when launching the from a SharePoint list. It will make sense in a few minutes.
Open the App link from the left side menu, and locate OnStart action.
Then copy the code from the code block from "set up your fake css" and paste it into the command window. Expand the window to see as much as you want.
Next, I have to get these variables to initialize. To do this, I click the ... menu next to Apps and choose Run OnStart
This initializes all the variables I will using and makes working in the editor a lot easier. I can review the variables in the Variables section of PowerApps. Any time I change a variable value, I just re-run Run OnStart for them to apply.
This can be useful for troubleshooting.
Apply the CSS to a DataCard
Now for the fun part!
From here it's a lot of copy-paste actions. Its way easier to copy paste than to type everything.
First select a card and unlock it if needed by right clicking and choosing Unlock.
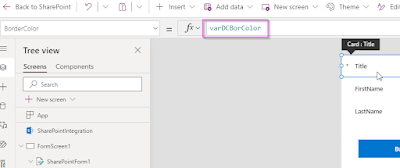
First I will do BorderColor by selecting it from the dropdown.
Replace the text thats in there with your variable. In this case varDCBorColor
I will repeat this action on the other border elements, BorderStyle and BorderThickness. PowerApps alerts me that these items have been modified by showing them in bold.
I am starting see the styles take share. but for impact, I applied the variables to each of my datacards. Below you can see consistent formatting of the border.
Repeat this process for each element from Font size to Fill colors.
Make changes to styling
I can now make a change to a variable, run the OnStart action and every place that variable is used with get the new style.
Here I and going to change the color of the border and make it 5 pixels.
Now I run OnStart and I didn't have to click on any DataCards.
Adjusting the left/right DataKey and DataValue elements.
I wanted to show a more complex part of this, and that's the ability to adjust the placement of the elements. Maybe you want the DataKey label to be bigger or smaller or maybe the form will be responsive. Hard coding items breaks responsive form sizing. I can leverage variables to help there too.
Look at the Width calculation for the DataKey. It's using a calculation to get the width so that it takes up 40% of the space, I want it to take up 30 percent and the Value card to take up 70 percent.
Replace the 0.4 with the variable varDCLeftCol (or varDCRightCol if you are on the data value) just make sure the totals of the two variable equal one. It won't hurt anything, it will just give you more white space than you expect to see as show below.
Now the variable is applied to the data card value to take up the extra space.
Shortcuts where we can take them
There are a few things where we can take a few shortcuts. If you click on a data card, and select "CTRL-A" to select all, you can apply things like fonts and text sizes to the entire contents of the data card. Take the advantage when you can to prevent have to paste over and over again.
Apply your formatting for SharePoint
If you are applying this formatting to a SharePoint list form, you will need to copy the variables to multiple places in the SharePointIntegration section of the PowerApp. Click SharePointIntegration to activate it.
Then add the variables to each of these sections.
There is a benefit to having separate sections like this, you can change the format for each mode. If you want Helvetica for OnView and Segui for OnEdit, go for it!
Conclusion
A little bit of extra work in the beginning of the project can make modifying these forms in the future a lot easier. In the future, I hope that we can simply apply formatting just like we do in CSS on web pages and this will have to do until then.